In Part 1 we discussed the importance of having an SSL certificate and how to generate them for free with Certbot. As we continue the process, you’ll need access to:
- Terminal (on Mac go to Applications > Utilities > Terminal)
- CPANEL Admin access where you can access both
- File Manager (you can also use FTP) and
- SSL/TLS Manager
Generating the Certificates
In the Terminal app, type this command to create a new certificate (swap your own domain in both spots that say “yourdomain.com”)
sudo certbot certonly -a manual –rsa-key-size 4096 -d yourdomain.com -d www.yourdomain.com
You will probably need to enter your computer’s admin password to proceed, and then type “y” to allow your IP Address to be logged.

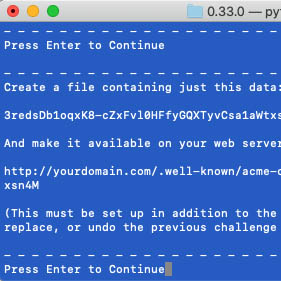
In your web browser, follow the steps for creating the two verification challenge files in .well-known/acme-challenge on your server. (For me, it’s significantly faster to use the File Manager tool within CPANEL instead of FTP. )


You will do this two times – adding separate files with the verification data to your server.

Once the files are verified your certificate will be created – Congratulations you’re ready to install an SSL certificate onto your server!

In the confirmation message, Certbot tells you exactly where your full chain and private key files are saved. You’ll use a new command (vi) to open these files.
Copy the fullchain.pem file path starting with “/etc/…” (Your file’s actual location may vary.) Type “sudo vi” and paste the file path, then press enter.
Copy everything from the starting “—–BEGIN CERTIFICATE—–” down to the last dash in the “—– END CERTIFICATE—-” line. Ignore anything that comes after the top certificate ending.

Now, head back to your browser window and open the CPANEL SSL manager. You’ll find it further down in the security section.

Then click “Manage SSL sites”.

In the far right column of the row for the certificate’s domain, click “update certificate”, then scroll all the way down to the section called, “Install an SSL Website.”
Paste this entire fullchain.pem contents that you copied earlier into the space for Certificate: (CRT).

Switch back to your Terminal window and type the command “q:” to close the previous fullchain.pem file.
Next, copy the second file location – the one for your private key. It also starts with “/etc/…”, but ends in “…privkey.pem”.
Type “sudo vi” and paste that second file’s path, then press enter.
sudo vi /etc/…/privkey.pem
Again, copy everything from the starting “—–BEGIN PRIVATE KEY—–” down to the last dash in the “—-END PRIVATE KEY—-” line.
Switch back to your SSL Manager in the browser window and paste this super long string of odd text and numbers into the Private Key (KEY) box.
Click the blue button to “Install Certificate”.

If everything has been entered correctly you’ll see a pop-up window confirming the new SSL certificate has been installed and is now active and accessible via https on yourdomain.com.
Certbot will send a renewal reminder via email 30 days before the SSL certificate expires. Follow these instructions step by step again to generate and install a new certificate before the old one runs out and you’ll have no issues with the pesky browser warnings.