I’m old enough to remember having our very first dial-up connection to the internet with AOL. The idea of having an ongoing connection to the internet wasn’t even something we could fathom as teenagers. We had a greater level of patience with connectivity issues – including when someone in the house needed to make a phone call and they kicked you off line in the process. Everything was slow and the internet was all one big magical mystery.
Fast forward a few decades and now we not only have constant access to the internet, because of our mini pocket computers (aka cell phones) the world is literally at our finger tips.
We’ve become more savvy with navigating the internet, and less patient with slow loading websites. According to a recent Think With Google article on Mobile, Data and Measurement, “53% of mobile site visits leave a page that takes longer than three seconds to load.” No one likes traffic.
Page Speed matters to Google and is factored into their rankings for mobile searches. So if optimizing for search engines is your thing, you can’t discount the importance of fast-loading web pages on your site.
Every second counts.
So how can you tell if your site is a slow poke online?
There are tools like Google’s Page Speed Test and GTMetrix that let analyze your own site’s performance. They also give recommendations of what you can do to improve your site’s page speed.
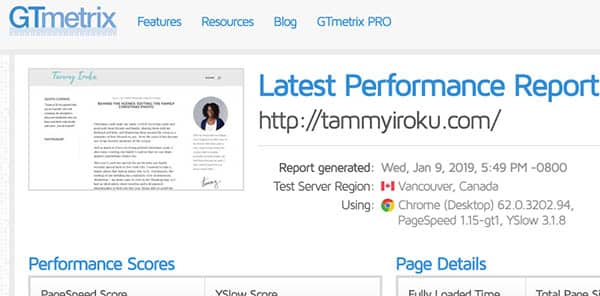
Before doing my own site’s optimization, I ran a quick analysis for this site using GTmetrix to show you what you don’t want your score to be. . .

Yep, that’s right! A big fat red “F”! The page took 5.2 seconds to load which is crazy. So now that we know the unfortunate truth, what can we do to speed things up?
The first two items under the recommendations column tell us that serving scaled images and optimizing images will give us a boost. So let’s do it!
Serve Scaled Images
It’s not uncommon to take a photo, upload it to the WordPress media gallery, and then use the WordPress built-in resize tool and CSS to make it fit the space.

The problem with this method of resizing after uploading is that the web page still loads the full-sized image along with its extra data. The resize action all happens in the twinkling of an eye, but when the same action happens 10x, 20x, 30+ times on a single page – that’s a lot of unnecessary data being transferred just to display a smaller version of the image!
One solution is to use an image editing tool like Photoshop (or even Canva) to resize the image to maximum 1920px wide before saving. If your image won’t be used in full screen, then you can size down the width even more.
The page speed report can be a useful starting point for images that need to be resized, saved again and re-uploaded at a smaller size. But, before you get started with resizing to serve scaled images, let’s also look at how we can also optimize images with compression.
Optimize Images
When I say “image optimization”, I’m essentially describing a process where you get your image file size down to the smallest it can be without sacrificing the quality. The smaller the file size, the faster the images will transfer from the host server to your browser window, and the faster the web page will load.
Saving optimized images through GTmetrix
The beautiful thing about the GTmetrix tool, is that in your report it will give you a link to view (and save) the optimized version of the image. You can manually save the new images and swap them out on your site and voila!

A savings of just a few kilobytes seems small, but when compounded over tens and hundreds of images throughout the site it begins to add up!
Saving optimized images with Photoshop
If you want to do this manually and have access to Photoshop, then I’d also recommend converting any PNGs to JPGs if you don’t need the transparent background to reduce your file size even more. In my own example, I was able to reduce the image size from 307KB down to 88KB by adjusting the file settings to JPG, Quality: 70%. TIP: Anything in the 60-80% quality range will be safe for most web images to compress them with little to no noticeable difference.


At this point you may be wondering if this image optimization process will take 5 months or 5 years because you already have hundreds of images saved to your website. If that’s you, then wonder no more. I’ve saved the best for last 🙂
There is a web app called Imagify by WP Media that helps with image scaling and compressing all in one! There is also a WordPress plugin that will bulk optimize your site’s current images and auto-optimize images directly on your website as you upload them to the media gallery. The free version has some limitations, but it’s a good place to start if you have too many images to tackle the issue manually.
Once you get it all cleaned up, remembering to resize and compress images before uploading will be the key to keeping your website at top speed.

and the page size went from 12.4MB down to 1.89MB. Whoo hoo! But we aren’t done yet. . .
After optimizing most of the images on my site, I was able to bring my score up to a C+! I’ve never been one to accept average, so next we’ll get into making some caching adjustments and a few other tricks to bring the final page load speed to an A+!
Until then, happy image optimizing!